Showing posts with label cuttlebug. Show all posts

Wednesday, April 8, 2009

Busy Hands, Happy Hearts Layout

(sorry, having a hard time flipping this over and resizing)

It's wonderful when the kids are out of school. I can actually come home and scrap -- no homework to worry about! Woohoo

Tonight I opened my new Cricut Sesame Street font cart and used it on this layout. Our little girl went into her sister's makeup and found one that she got as a party favor. Don't ever give those out, they are horrible. It was so greasy not even bath soap would take it off. Thank goodness hubby thought of using dish soap or we'd be scrubbing for a long time.

Materials Used:

  • Cricut Sesame Street font cart
  • DCWV Spring Stack (cardstock & patterned paper)
  • DCWV Spring Rub-ons
  • Cuttlebug die hearts (in blue)
  • Martha Stewart heart punch (hearts in patterned paper)
  • Cuttlebug Swiss Dots folder (embossed letters)

Saturday, January 24, 2009

Grandma's Favorite Flowers Layout


My grandma passed away 10 years ago. Last year was the first time I visited the country she was born in. The pictures on this layout were taken near the church where she got married and of the purple flowers my mother said she loved.

Doll Party Layout


Woohoo.....finally had a chance to scrap. It's been too long! I've been working on my Brazil vacation album. I have several layouts done but haven't posted any pics on my blog yet.
My cousin threw a doll party for the girls. She handed out Cinderella invitations just like a real party and decorated the table with Cinderella partyware. It was really cute! Then she put out all sorts of snacks and brought out a chocalate heart with candles for the cake. The girls had a blast!

Materials Used:
DCWV Spring Cardstock Stack
DCWV Sweet Stack
Cuttlebug Birthday Die Set
Chipboard
Martha Stewart Glitter
DMC Floss
Button (from Target)

Wednesday, November 26, 2008

Joys of the Season Arrved Today ~ Festive BDay Card


Wooohooo Joys of the Season arrived today. I always thought having Christmas Cheer was good enough but I guess the sale price of $29.99 changes everything. I confess, I did like some of the cuts on this cart and the mittens is one of my favorites. So today after I came home from work I got busy making a festive birthday card for my friend's upcoming birthday.

The border was cut out using a Martha Stewart punch. Reminds me a lot of the famous threading water punch.

Wednesday, August 27, 2008

MICKEY MOUSE ~ 7TH BIRTHDAY ~ CARD

We have a birthday party this weekend and I was about to buy a Wall-e card for the birthday boy but hubby said I could just make him one. So off I was to create this birthday card. I didn't know what to do. It's easier for me to create for a female than for male. I feel like we're kind of limited in what we can do for the males. I'm really pleased with the way the card turned out. I used Cricut's Mickey & Friends cartridge for the Mickey. The font is Cricut's Mickey Font. I used a Studio G stamp for the word "Happy Birthday." I heat embossed it using red embossing powder by Stampendous. I embossed the letters with Cuttlebug's distressed stripes folder and the area behind Mickey with Cuttlebug's traffic jam folder.

The paper is by Making Memories. The ribbon is from Michael's. I used a Martha Stewart punch to punch out the circle. I love how it came out. I had never done that before and it was just an idea that popped into my head. I then stamped the number using a Martha Stewart clear stamp set I have.
I also used stickles (frosted lace) for Mickey's hands.
So I had the front all done and then I stamped the inside with Happy Birthday. ACK....I stamped it upside down. So I had to cover up my boo boo. The folder it was. I used Cricut's Fabulous Finds. I figured I could use it to stick in the gift card or $. So I went to stamp the Happy Birthday above the folder. Ugh....I did it again. So that's why I mounted the paper with the word "Happy Birthday." It actually turned out cute - it coordinates w/ the paper in the front. LOL

Sunday, July 27, 2008

Princess Ariel Personalized Birthday Card


This one was easier to do than the bottom Jasmine card. This is for a girl who loves Ariel and her middle name is Arielle. :-)


The font is Cuttlebug's Curl & Swirls alphabet dies (my favorite font). I used the Cuttlebug Swiss Dots folder to emboss the flower and bra top.

Princess Jasmine Personalized Birthday Card


We have a birthday coming up for a special little girl who adores Jasmine. It took me a while to get this card done and realized again how frustrating the Cricut princess cartridges are to work with. There are so many little pieces that you don't know where they belong or they tear. Thank God for stickles. They come to the rescue all the time. They were my lifesaver with this princess doll. Even though I have my gripes about this cart, it's worth it. Just make sure you have stickles on hand. :-)

The font is Cuttlebug's Curls & Swirls alphabet die. I keep going back to this font - I just love it!!! It's so dainty and pretty.

Thursday, July 24, 2008

My First Bind It All Photo Album ~ Easter

This is my very first bind-it-all photo album. I used 1" wires.
The paper is all from DCWV's Spring Stack except the pink strip on the left of the cover (it's Bazzill Bling)
The butterfly is chipboard from DCWV's Blossoms & Butterflies.
"Easter" was cut out with a Cuttlebug alphabet die.


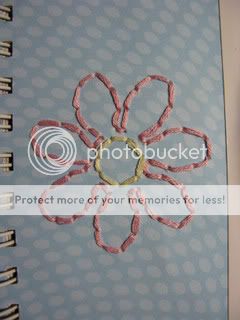
I used Bazzill In-stitchz In the Garden template for the stitching


close up of stitching


more close-ups

and one more...
close up of stitching (Bazzill In-Stitchz template)


I used Martha Stewart's Ribbon Threader Punch & Ribbon from M's.
I found the these thin ribbons to work perfectly with this punch.


close up of ribbon threaded through paper


a cute little dragonfly brad


M Michael's ribbon with a small Prima flower dotted with pink stickles


Ribbon from Michael's. Used Martha Stewart's pop up punch and accented it with a crysal brad


Stamp is from Michael's $1 bin (wood mounted type)
I heat embossed it with Adirondack lettuce embossing powder.
It was my first time using this brand and I love it!
You'll notice that it leaves a nice shiny raised finish whereas the Stampendous brand I've been using leaves a flat dull image (you'll see it used below on the flourishes).

Here I used the Stampendous embossing powder brand. I added stickles (crystal) for a little bit of bling.
The stamp is by Fancy Pants.


This stamp is one of those Studio G clear stamps. I also added stickles (crystal) for some bling.


Isn't this flourish great? It's by Fancy Pants. I can't recall if it's the Fresh MOD or the Pollen Dust set as I have both. I added stickles (crystal) for bling. The flower is a Prima flower with stickles (crysal) and a clear skittle.


Now look at this flourish - aren't they amazing? It's also by Pollen Dust.
Again stickled (crystal) for some bling.


accented this page with tiny buttons as centers of flowers


Ribbon is from Michael's


Bazzill In-Stichz Temlate


Bazzill In-stitchz templates

I used my Fiskars threading water punch as the stem of the flower (cut on bazzill bling paper)
The flower is a Prima flower that came in my grab bag from CafePrima.
In the center are skittles.

Back Cover

Sunday, July 20, 2008

Bind it All Book ~ Easter Egg Coloring

This is the first bind it all (photo) album I created.
The wires turned out to be a wee bit small. I used the 1/2".
I now got some 3/4" which would have worked out better. I think the 3/4" is probably the most versatile.
It's better to have extra room than it be tight and the pages can't turn freely.
Do you know what's under the paper?? Cereal boxes! They make great chipboard.
I used DCWV's Spring Stack paper for all the pages.
On the cover I use ribbons from Target's $1 spot (aren't they great?)
All the white rub-ons are from DCWV's Spring Stack.
The stitching is Bazzill In-stitchz templates.
I used Cuttlebug alphabet dies for the font. The word "Coloring" was cut out on Bazzill Bling paper.
The star, hearts, and bunny are rub-ons from DCWV's Spring stack

The "happy day" stamp is from Studio G. I heat embossed it using Adirondack's embossing powder in lettuce. I was use to using the Stampendous embossing powder and I was super impressed with the Adirondack one I used on this page.
It gave it a nice shinny raised finish.

The butterfly is a Martha Stewart punch.

Did you ever punch the wrong side of your paper? I sure did.
So I had to come up with a way to fix it. I used the threading water punch (the famous punch known to have been quite extinct - I only waited two months for this punch....only, huh?) and then applied some butterflies I punched out with a Martha Stewarts punch. I added stickles on the pink butterflies for some bling.

The bunny, star, and the word "bunny" are from DCWV's Spring Stack.


The word "Fun" and the egg are from DCWV's spring stack.


The eggs are DCWV's Spring Stack rub-ons


The arrow is Bazzill In-Stitchz. The star and eggs are DCWV's Spring Stack rub-ons.

The small stars are rub-ons and the larger ones are Bazzill In-stitchz.


On this page I used rub-ons from DCWV's Spring Stack (the flowers, the word Princess, and the heart on the picture).

I used my Bazzill In-stitchz "In the Garden" template for the flower.

I removed the flash to try and get the best close up pictures and some images came out a bit blurry but nonetheless you can see the detail. On this page I used rub-ons from DCWV's Spring Stack and the Bazzill In-stitchz templates.


I used my new Bazzill In-stitchz templates. I just love these. I really enjoy doing the stitching.


"Eggs" is a rub on from DCWV's Spring Stack

Back Cover